There’s something truly magical about a cake that’s almost too beautiful to eat. And when it comes to intricate, show-stopping confections, the Lambeth Method reigns supreme. This classic British piping technique, known for its elaborate over-piping, delicate scrolls, and ornate details, transforms a simple cake into a work of edible art. If you’ve ever dreamt of creating a cake that looks like it stepped out of a royal wedding or a vintage confectionery shop, you’ve come to the right place. We’re about to dive into the best Lambeth cake recipe that will not only guide you through baking a perfectly moist cake but also equip you with the foundational skills to master this stunning decorating style.
What Makes a Lambeth Cake So Special?
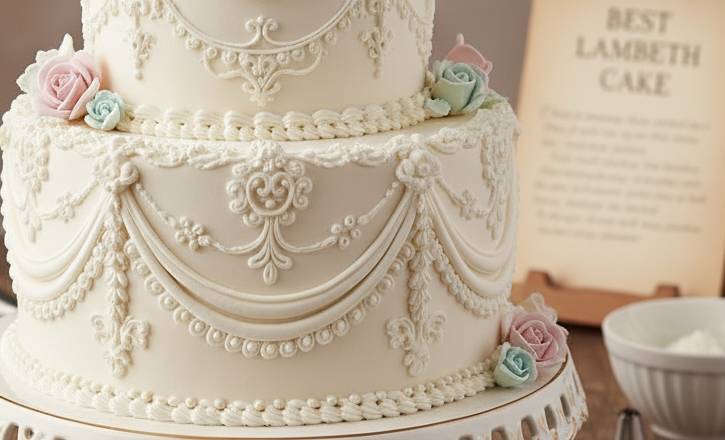
The Lambeth Method isn’t just about decoration; it’s a legacy. Developed by Joseph Lambeth in the early 20th century, it taught home bakers and professional decorators alike how to create dimension and grandeur using royal icing. Think cascading garlands, intricate lace-like patterns, and bold architectural elements, all built up layer by delicate layer. While traditionally made with royal icing, modern interpretations often use sturdier buttercream for a more approachable and equally beautiful finish. Our recipe focuses on a delicious and stable vanilla cake base, paired with a resilient buttercream that holds its shape beautifully for all those stunning details.
The Best Lambeth Cake Recipe: Vanilla Celebration Cake
This recipe yields a tender, flavorful cake that’s sturdy enough to support the elaborate decorations of the Lambeth method.
Yields: One 8-inch, 3-layer cake Prep time: 45 minutes Bake time: 25-30 minutes per layer
Ingredients:
For the Vanilla Cake:
- 2 ½ cups all-purpose flour, sifted
- 1 ½ cups granulated sugar
- 1 tablespoon baking powder
- ½ teaspoon salt
- 1 cup (2 sticks) unsalted butter, softened
- 4 large eggs, at room temperature
- 1 cup whole milk, at room temperature
- 2 teaspoons pure vanilla extract
For the Stable Vanilla Buttercream:
- 4 cups (8 sticks) unsalted butter, softened
- 8 cups powdered sugar, sifted
- 4-6 tablespoons heavy cream or whole milk
- 2 teaspoons pure vanilla extract
- Pinch of salt
Equipment You’ll Need:
- Three 8-inch round cake pans
- Parchment paper
- Electric mixer (stand or hand mixer)
- Spatulas
- Piping bags
- Assorted piping tips (especially small round, star, and shell tips for Lambeth work)
- Cake turntable (highly recommended for decorating)
Step-by-Step Instructions:
Part 1: Baking the Vanilla Cake
- Preheat & Prep: Preheat your oven to 350°F (175°C). Grease and flour three 8-inch round cake pans. Line the bottoms with parchment paper.
- Combine Dry Ingredients: In a large bowl, whisk together the sifted flour, granulated sugar, baking powder, and salt.
- Cream Butter: In a separate large bowl (or the bowl of your stand mixer), cream the softened butter until light and fluffy, about 2-3 minutes.
- Add Eggs: Add the eggs one at a time, beating well after each addition until fully incorporated. Scrape down the sides of the bowl as needed.
- Alternate Wet and Dry: Gradually add the dry ingredients to the wet ingredients in three additions, alternating with the milk, beginning and ending with the dry ingredients. Mix on low speed until just combined – do not overmix. Stir in the vanilla extract.
- Divide and Bake: Divide the batter evenly among the three prepared cake pans.
- Bake: Bake for 25-30 minutes, or until a wooden skewer inserted into the center comes out clean.
- Cool: Let the cakes cool in the pans for 10-15 minutes before inverting them onto a wire rack to cool completely. Ensure they are fully cooled before frosting.
Part 2: Making the Stable Vanilla Buttercream
- Cream Butter: In the bowl of your electric mixer, beat the softened butter on medium-high speed until it’s very light and fluffy, about 5 minutes. This is crucial for a smooth buttercream!
- Add Powdered Sugar: Gradually add the sifted powdered sugar, one cup at a time, mixing on low speed until combined, then increasing to medium-high. Continue until all sugar is incorporated.
- Add Liquids & Flavor: Pour in 4 tablespoons of heavy cream or milk, vanilla extract, and a pinch of salt. Beat on medium-high speed for another 3-5 minutes until the buttercream is incredibly light, fluffy, and smooth. If it’s too thick, add more cream/milk one tablespoon at a time. If it’s too thin, add a bit more sifted powdered sugar.
- Tint (Optional): If you plan to color your buttercream, divide it into separate bowls and mix in gel food coloring as desired.
Part 3: Assembling and Decorating Your Lambeth Cake
- Level Your Cakes: Use a serrated knife to level the tops of your cooled cake layers if needed, creating a flat surface for stacking.
- Crumb Coat: Place one cake layer on your cake stand or turntable. Spread a thin layer of buttercream over the top. Place the second layer on top, spread buttercream, and then add the third layer. Apply a thin layer of buttercream all over the cake (top and sides). This is the crumb coat, designed to trap any loose crumbs. Chill the cake in the refrigerator for 20-30 minutes until the crumb coat is firm.
- Final Base Coat: Apply a thicker, even layer of buttercream to the entire cake, smoothing it as much as possible. This will be the canvas for your Lambeth piping. Chill again until firm.
- Lambeth Piping (The Fun Part!):
- Practice Makes Perfect: If you’re new to Lambeth piping, it’s highly recommended to practice on parchment paper before applying it to your cake.
- Outline: Start with basic outlines. Using a small round tip, pipe simple lines or patterns (like diamonds, scallops, or arches) as your guide for future layers.
- Over-Piping: This is the hallmark of the Lambeth Method. Using a star or shell tip, pipe a second layer of decoration directly over your outlines, creating dimension and depth. Think of building up layers of frosting.
- Adding Details: Experiment with different tips (small star, shell, round, leaf) to add various elements:
- Scrolls and Swags: Pipe elegant scrolls along the edges or create drooping swags.
- Shell Borders: Classic shell borders add a refined touch.
- Rosettes and Flowers: Small rosettes or simple piped flowers can fill in spaces.
- Pearls and Beads: Use a small round tip to pipe tiny dots that resemble pearls.
- Layering: The key is to allow each layer of piping to slightly firm up before adding the next, especially if using royal icing. With buttercream, work steadily but gently. Build up your designs, creating a beautiful relief effect
5. Final Touches: Once your Lambeth piping is complete, you can add edible glitter, pearls, or a personalized message to truly make it shine.
Conclusion
Creating a Lambeth cake is a journey of patience, practice, and immense satisfaction. This best Lambeth cake recipe provides you with a sturdy and delicious foundation, while the decorating guide encourages you to unleash your inner artist. Don’t be intimidated by the intricate designs; start with simple patterns and gradually build your skills. Each scroll, shell, and dot you pipe brings you closer to mastering this elegant technique. The result? A stunning centerpiece that will not only impress your guests with its beauty but delight them with its irresistible flavor. So, gather your tools, roll up your sleeves, and get ready to bake and decorate a masterpiece that will make any celebration truly dazzling!
FAQ
Q1: What’s the main difference between traditional Lambeth method and modern Lambeth cakes?
A1: Traditionally, the Lambeth method uses royal icing, which dries hard and allows for very fine, crisp details and intricate layering. Modern Lambeth cakes often use a stable buttercream, which is softer, easier to eat, and still holds intricate designs well, though perhaps with slightly less sharpness than royal icing. Our recipe uses buttercream for ease and deliciousness.
Q2: Can I use a different cake flavor for this recipe?
A2: Absolutely! While vanilla is a classic choice, this cake base is versatile. You can use lemon zest, almond extract, or even a chocolate cake recipe as long as it’s sturdy enough to support the decorations. Ensure your cake is dense enough not to crumble under the weight of the frosting.
Q3: My buttercream isn’t holding its shape for piping. What went wrong?
A3: This is a common issue! Several factors could be at play: * Butter Temperature: Your butter might be too warm. It should be softened but still cool to the touch. If it’s too warm, chill your buttercream for 10-15 minutes, then re-whip. * Insufficient Whipping: Ensure you’ve creamed the butter for the full 5 minutes and then whipped the final buttercream for another 3-5 minutes. Aeration makes it stable. * Too Much Liquid: Reduce the amount of heavy cream/milk. Add it slowly, one tablespoon at a time, until you reach the desired consistency. You can also add a bit more sifted powdered sugar to thicken it. * Room Temperature: If your kitchen is very warm, the buttercream might soften quickly. Try working in a cooler environment or chilling your piping bags periodically.
Q4: Do I really need a cake turntable?
A4: While not strictly mandatory, a cake turntable makes smoothing your base coat and executing continuous piping designs (like scrolls and borders) significantly easier and more professional-looking. It allows you to rotate the cake smoothly as you work.
Q5: How far in advance can I make a Lambeth cake?
A5: You can bake the cake layers 2-3 days in advance and store them, well-wrapped, at room temperature or frozen for longer. The buttercream can be made up to a week in advance and stored in an airtight container in the refrigerator; bring to room temperature and re-whip before use. Once fully decorated, a buttercream Lambeth cake is best enjoyed within 2-3 days, stored in a cool, dry place or refrigerated. If refrigerating, let it come to room temperature for about 30 minutes before serving for the best flavor and texture.
Q6: What piping tips are essential for beginners to Lambeth piping?
A6: Start with a few versatile tips: * Small Round Tip (e.g., Wilton 2, 3): For outlines, dots, and very fine details. * Small Star Tip (e.g., Wilton 16, 18, 21): For shells, star accents, and some over-piping. * Small Shell Tip (e.g., Wilton 101, 102): For classic shell borders and intricate swags. Investing in a basic piping tip set is a great way to start.