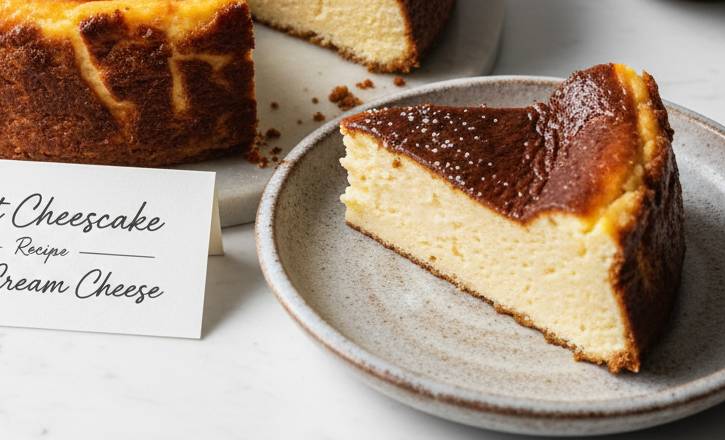
Move over, classic New York-style cheesecake! The Burnt Basque Cheesecake, a rustic, crustless marvel first popularized in the Spanish city of San Sebastián, has taken the world by storm. Its intentionally caramelized, almost “burnt” exterior gives way to a famously creamy, custardy, and slightly runny interior—a texture contrast that is truly addictive.
While most recipes call for large quantities of ingredients, this small-batch version is perfect for when you need an impressive yet simple dessert for a small gathering, or just want to treat yourself.
Using just 250g of cream cheese, this recipe minimizes waste and maximizes flavor. Get ready to embrace the scorch and create the easiest, most delicious cheesecake you’ll ever make.
Step-by-Step Guide to the Perfect Small-Batch Burnt Cheesecake
This recipe requires minimal effort, no crust, and no stressful water bath!
Ingredients (Yields a 4-6 inch cake):
- 250g (8 oz) Full-fat Cream Cheese, softened to room temperature
- 75g (⅓ cup + 1 tbsp) Granulated Sugar
- 1 Large Egg (about 50g), room temperature
- 125ml (½ cup) Heavy Whipping Cream (35% fat content), room temperature
- 5g (1 tsp) All-Purpose Flour
- Pinch of Salt
- ½ tsp Vanilla Extract (optional)
Equipment:
- 4-inch or 6-inch round cake pan (springform or regular)
- Parchment paper
- Hand mixer or whisk
Step 1: Prep the Oven and Pan
- Preheat your oven to a very high heat: 400°F (200°C). The high heat is crucial for achieving the “burnt” exterior quickly.
- Line the Pan: This is key. Take a large sheet of parchment paper and crumple it up lightly. This makes it more pliable. Uncrumple it and use it to line your pan, allowing the paper to hang over the edges by at least 2 inches. The paper should be intentionally wrinkled; this is part of the rustic look.
Step 2: Mix the Batter (The Easiest Part)
- Cream Cheese and Sugar: In a medium bowl, beat the softened cream cheese and sugar until the mixture is completely smooth and creamy. Scrape down the sides of the bowl to ensure no lumps remain.
- Add Egg: Beat in the egg (and vanilla, if using) until just combined. Do not overmix here, as incorporating too much air can result in a drier cake.
- Whip in Cream: Slowly pour in the heavy whipping cream while continuing to mix on low speed until the mixture is uniform.
- Add Flour: Sift or sprinkle in the all-purpose flour and salt. Mix gently until just incorporated, ensuring the batter remains silky smooth.
Step 3: Bake and Cool
1.Pour and Bake: Pour the batter into the prepared pan. Give the pan a gentle tap on the counter to pop any large air bubbles.
2. Bake for 30 to 40 minutes. The goal is a deeply dark brown (or even black) exterior and a center that is still very jiggly when you gently shake the pan.
- Pro Tip: If the cake isn’t dark enough after 30 minutes, increase the oven temperature to 425°F (220°C) for the last 5-10 minutes, watching closely.
3.Cool Down: Once baked, remove the cake and let it cool completely on a wire rack at room temperature for about 1 hour. The cake will deflate significantly and continue to set as it cools.
4.Chill: Transfer the cake to the refrigerator and chill for at least 4 hours, or preferably overnight. The chilling process finishes setting the creamy center.
Conclusion
The Burnt Basque Cheesecake is a testament to the fact that sometimes, imperfection is exactly what makes a dessert perfect. The crispy, bitter caramel top, the tangy and sweet interior, and the simple ingredient list make it a unique and unforgettable dish.
This 250g recipe is your secret weapon for a sophisticated dessert with minimal fuss. Serve it chilled for a firmer slice, or let it sit at room temperature for 30 minutes for that classic, beautifully gooey, custardy center. Enjoy your beautiful, intentionally “burnt” masterpiece!
FAQ
Q1: Is it safe to eat a cheesecake that looks “burnt”?
A: Absolutely! Unlike a truly scorched cake, the crust on a Burnt Basque Cheesecake is intentionally caramelized at a very high temperature. This creates a deep brown to near-black color and imparts a wonderful, slightly bitter, smoky, and intensely caramelized flavor, similar to the top of crème brûlée. This “burnt” flavor is essential to the cheesecake’s unique character.
Q2: Why is my cheesecake still so wobbly in the center when I take it out of the oven?
A: It’s supposed to be! The center should be very jiggly, almost like thick pudding or gelatin, when you remove it. The cheesecake continues to set as it cools at room temperature and then finishes setting completely during the chilling period in the refrigerator. If you bake it until it’s firm, the finished product will be dry and dense.
Q3: Do I really need to use full-fat cream cheese and heavy cream?
A: Yes, it is highly recommended. The characteristic creamy, custardy texture of the Burnt Basque Cheesecake comes from the high fat content of both the full-fat cream cheese and the heavy whipping cream. Using low-fat or reduced-fat versions can lead to a watery batter and a drier, less luxurious final texture.
Q4: My cake didn’t get a dark top. What went wrong?
A: The most likely culprits are:
- Oven Temperature: Your oven may not be running as hot as the dial indicates. Use an oven thermometer to verify the temperature.
- Baking Time: You may need to bake it longer. Don’t be afraid of the scorch!
- Use the Broiler (Carefully): If the center is set but the top isn’t dark enough, you can turn on the broiler (top heat) for the last 1–2 minutes, but watch it constantly—it can go from brown to burned very fast.
Q5: Can I make this with a regular amount of cream cheese (e.g., 500g)?
A: Yes, you can double this recipe to use 500g (about 1 pound) of cream cheese. If you double the recipe, you should use a 6-inch or 7-inch pan and the baking time will increase, likely to around 45–60 minutes at the same high temperature. Always look for that jiggly center as your sign of doneness.