The notion of a “poke cake” often evokes images of casual gatherings and nostalgic flavors. While its inherent charm lies in its simplicity and comforting familiarity, my approach to any dish, no matter how humble its origins, is always one of precision, quality, and an unwavering commitment to exceptional flavor.
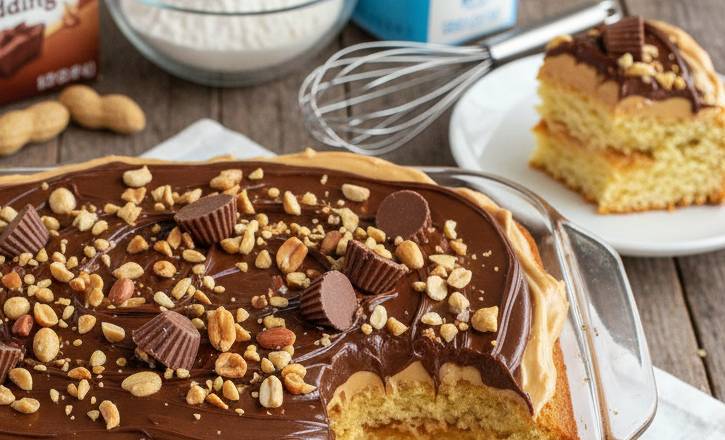
Today, we elevate the quintessential Peanut Butter Poke Cake with Pudding, transforming it from a straightforward indulgence into a testament to meticulous technique and balanced taste.
We will deconstruct this beloved dessert, replacing convenience with intention. Forget the boxed mixes and instant powders; our sponge will be light and tender, our peanut butter pudding a silken, rich custard crafted from scratch, and our topping a delicate, salted Chantilly.
This is not merely a recipe; it is a lesson in how thoughtful execution can transform the familiar into the truly extraordinary.
The Foundations: Ingredients & Preparation
- Note: Precision is paramount. All ingredients are listed by weight for consistent, repeatable results, a standard practice in my kitchens.
- Yields: 12-16 servings Prep time: 60 minutes Bake time: 28-32 minutes Chill time: At least 4 hours (preferably overnight)
1. The Buttermilk Sponge (The Foundation of Texture)
- 250g Cake flour, sifted
- 300g Granulated sugar
- 5g Fine sea salt
- 6g Baking powder
- 2g Baking soda
- 115g Unsalted butter (high-fat, European style), very soft, room temperature
- 120g Large eggs (approx. 2.5 eggs), at room temperature, lightly beaten
- 240g Full-fat buttermilk, at room temperature
- 10g Pure vanilla bean paste
2. The Peanut Butter Pastry Cream (The Silken “Pudding”)
- 500g Whole milk
- 100g Granulated sugar, divided
- 40g Cornstarch, sifted
- 80g Large egg yolks (approx. 4 yolks)
- 150g Natural creamy peanut butter (finely ground, no added sugar or palm oil)
- 30g Unsalted butter, cold, cubed
- 2g Fine sea salt
3. The Salted Peanut Chantilly (The Elegant Crown)
- 300g Heavy cream (cold, minimum 36% fat)
- 30g Confectioners’ sugar, sifted
- 5g Pure vanilla extract
- 50g Toasted Spanish peanuts, finely crushed
- Garnish (Optional): Shavings of high-quality dark chocolate (70% cacao)
Methodical Execution: A Step-by-Step Approach
Phase 1: The Buttermilk Sponge – Building the Structure
- Prepare for Success: Preheat your oven to 175°C (350°F). Lightly butter and flour a 9×13 inch (23×33 cm) baking pan, tapping out any excess. This precise preparation prevents sticking.
- Dry Ingredients: In the bowl of a stand mixer fitted with the paddle attachment, combine the sifted cake flour, granulated sugar, salt, baking powder, and baking soda. Mix on low speed for 30 seconds to ensure even distribution.
- Incorporate Butter: Add the softened butter to the dry ingredients. Mix on low speed for 2 minutes, gradually increasing to medium, until the mixture resembles coarse sand, and all butter is fully incorporated. This “reverse creaming” method helps create a tender crumb.
- Wet Ingredients: In a separate bowl, whisk together the room temperature eggs, buttermilk, and vanilla bean paste until just combined.
- Combine & Emulsify: With the mixer on low speed, gradually add the wet ingredients to the flour-butter mixture in three additions, mixing only until just combined after each. Scrape down the sides of the bowl as needed. Do not overmix; over-developed gluten leads to a tough cake.
- Bake: Pour the batter evenly into the prepared pan. Bake for 28-32 minutes, or until a wooden skewer inserted into the center comes out clean.
- Cool & Rest: Remove from the oven and let cool in the pan on a wire rack for 15 minutes. This allows the cake to set before we introduce the “poke” elements.
Phase 2: The Peanut Butter Pastry Cream – The Heart of the Pudding
- Temper the Yolks: In a medium bowl, whisk the egg yolks with half of the granulated sugar and the sifted cornstarch until pale and smooth.
- Heat the Milk: In a heavy-bottomed saucepan, heat the whole milk with the remaining half of the granulated sugar over medium heat until it just begins to simmer, around the edges, but do not boil.
- Combine: Gradually, in a slow, steady stream, pour about half of the hot milk into the egg yolk mixture while whisking constantly. This tempering prevents the eggs from scrambling.
- Thicken: Return the tempered egg mixture to the saucepan with the remaining hot milk. Cook over medium heat, whisking continuously, until the pastry cream thickens significantly and comes to a gentle boil for 1 minute. This ensures the cornstarch is fully cooked out.
- Enrich & Flavor: Remove from heat. Whisk in the natural peanut butter and fine sea salt until completely smooth. Add the cold, cubed butter, whisking until fully incorporated and the pastry cream is glossy.
- Chill: Pour the pastry cream into a clean, shallow dish. Cover the surface directly with plastic wrap to prevent a skin from forming. Refrigerate for at least 2 hours, or until thoroughly chilled and firm.
Phase 3: Assembly – The Art of Layering
- Poke the Cake: Once the cake has cooled completely (at least 15 minutes, ideally longer), use the back of a wooden spoon or a dowel (approximately 1/2 inch in diameter) to create uniform holes across the surface of the cake. Space them about 1 inch apart. Consistency here ensures even distribution of the pudding.
- Fill the Pokes: Whisk the chilled peanut butter pastry cream until smooth and pourable. Carefully pour the cream over the poked cake, using an offset spatula to gently coax the cream into each hole. Ensure the entire surface is covered.
- Set: Refrigerate the cake for at least 2-3 hours (preferably overnight) to allow the pudding to fully set within the cake, creating that moist, integrated texture.
Phase 4: The Salted Peanut Chantilly – The Final Flourish
- Whip the Cream: In a very cold bowl (preferably chilled in the freezer for 15 minutes) of a stand mixer fitted with the whisk attachment, combine the cold heavy cream, sifted confectioners’ sugar, and vanilla extract.
- Whip to Soft Peaks: Begin whipping on low speed, gradually increasing to medium-high, until soft peaks form. Do not overwhisk, or it will become grainy. The goal is light, airy, and stable.
- Top & Garnish: Carefully spread the Chantilly evenly over the chilled cake. Sprinkle generously with the finely crushed toasted Spanish peanuts. For a touch of refined elegance, shave some high-quality dark chocolate over the top.
A Chef’s Final Word: The Sum of Its Parts
The Peanut Butter Poke Cake with Pudding, when approached with this level of detail, transcends its humble origins. Each component, from the meticulously prepared sponge to the rich, homemade pastry cream and the delicate Chantilly, contributes to a whole that is greater than the sum of its parts.
This dessert, while comforting, now speaks to a deeper understanding of flavor, texture, and the sheer joy of creating something truly exceptional.
Enjoy this refined indulgence, a testament to how even the simplest dishes can achieve culinary greatness through intention.
FAQ
Q: Can I use instant pudding mix to save time?
A: In a professional kitchen, time is an investment in quality. Instant pudding mixes rely on modified starches and artificial flavorings that cannot replicate the clean, rich mouthfeel of a house-made pastry cream. When you make your own custard, you control the sugar levels and the quality of the peanut butter.
The difference in the final texture—silky rather than gelatinous—is profound.
Q: Why do you specify “natural” creamy peanut butter?
A: Commercial peanut butters often contain hydrogenated oils and stabilizers designed to keep them shelf-stable and homogenized. These fats can leave a waxy film on the palate.
Natural peanut butter, consisting simply of roasted peanuts and perhaps a touch of salt, provides a more intense, authentic flavor and a superior emulsion when whisked into the warm pastry cream.
Q: My pastry cream has small lumps. Is it ruined?
A: Cooking is a series of corrections. If your pastry cream is lumpy, it likely means the heat was too high or the whisking was inconsistent. Do not despair. While the cream is still warm, pass it through a fine-mesh sieve (a chinois) into a clean bowl.
This will catch any coagulated egg or starch clumps, ensuring the final result is perfectly smooth.
Q: Why do we “poke” the cake while it’s still slightly warm?
A: We want the structure of the cake to be set, but the crumb to still be receptive. Poking the cake while it is slightly warm allows the holes to stay open and clear.
If the cake is too hot, the holes may collapse; if it is ice-cold, the crumb may resist the pastry cream. A 15-to-20-minute rest is the “sweet spot” for ideal absorption.
Q: Can I substitute the buttermilk with regular milk and lemon juice?
A: While the “homemade buttermilk” hack works in a pinch for simple pancakes, it does not provide the same viscosity or enzymatic reaction as true, cultured buttermilk. Real buttermilk provides a specific acidity that reacts with the baking soda to create a tender, airy crumb.
To achieve the Keller standard of texture, I strongly recommend using a high-quality, cultured buttermilk.
Q: How do I ensure the cleanest possible slices when serving?
A: Precision extends to the presentation. To achieve clean, professional edges, the cake must be thoroughly chilled—at least 4 hours, but ideally overnight. When ready to serve, use a long, sharp chef’s knife.
Dip the blade in hot water and wipe it clean between every single cut. This prevents the Chantilly and peanut butter cream from dragging through the sponge, resulting in a perfect cross-section.