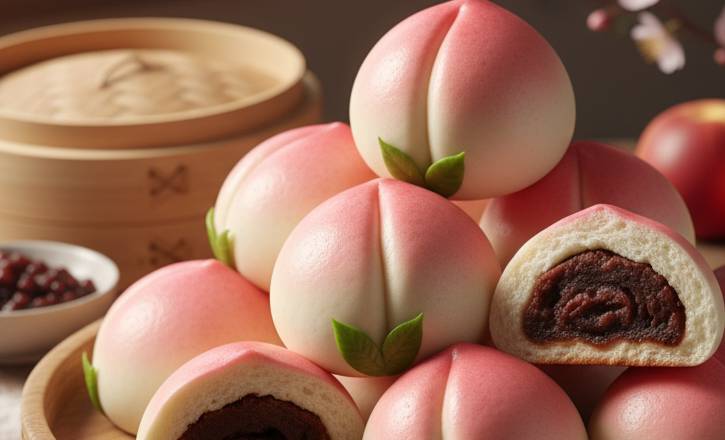
In many cultures, milestones—especially birthdays for the elderly—are deeply celebrated, and no element is more central to the festivities than the cake. In Chinese tradition, this role is filled by the Longevity Cake, or Shòu Táo Bāo (壽桃包), a beautifully crafted steamed bun shaped and colored like a peach.
The peach is a powerful symbol in Chinese folklore, known as the “Peach of Immortality,” believed to grant long life to those who consume it. Serving this cake is a profound way to honor parents and grandparents, wishing them health, prosperity, and, above all, many more years of life.
While modern American bakeries often create elaborate layer cakes with peach motifs, this article focuses on the classic, symbolic steamed peach bun—the authentic longevity cake—filled with a sweet, comforting red bean paste.
Ingredients
This recipe is for the traditional Longevity Peach Buns (Shòu Táo Bāo), making approximately 12 medium buns.
For the Steamed Bun Dough:
- 2 cups All-Purpose Flour (plus extra for dusting)
- ½ cup Warm Milk or Water (about 105°F to 115°F)
- 2 teaspoons Instant Dry Yeast
- ¼ cup Granulated Sugar
- 1 Tablespoon Vegetable Oil (or melted lard)
- ¼ teaspoon Salt
For the Filling (Red Bean Paste – Anko):
- 1 cup Sweet Red Bean Paste (Anko), store-bought or homemade
- (Note: This is often prepared in advance and shaped into 12 small balls.)
For Decoration and Coloring:
- Red or Pink Food Coloring (gel color recommended)
- Green Food Coloring or a small amount of Matcha Powder
- 1 small brush or cotton swab
Instructions (Step-by-Step)
Step 1: Prepare the Dough
- Activate the Yeast: In a large mixing bowl, combine the warm milk/water and sugar. Sprinkle the instant yeast over the top and let it sit for 5-10 minutes until it becomes foamy.
- Mix the Dough: Add the flour, salt, and oil to the yeast mixture. Mix until a shaggy dough forms.
- Knead: Turn the dough out onto a lightly floured surface. Knead for about 8 to 10 minutes until the dough is smooth, elastic, and no longer sticky.
- First Proof: Place the dough in a lightly oiled bowl, turn to coat, and cover with plastic wrap or a damp towel. Let it rise in a warm place for 60 to 90 minutes, or until it has doubled in size.
Step 2: Shape and Fill the Buns
- Punch Down: Gently punch the risen dough down to release the air.
- Divide and Reserve: Reserve about 2 tablespoons of dough for the green leaves. Divide the rest of the dough into 12 equal pieces.
- Color the Leaf Dough: Knead the reserved small piece of dough with a few drops of green food coloring or a small amount of matcha powder until the color is uniform. Wrap and set aside.
- Fill and Seal: Take one piece of white dough and flatten it into a circle, making the edges slightly thinner than the center. Place one ball of red bean paste in the middle. Gather the edges of the dough to enclose the filling completely and pinch the seam closed. Roll the bun gently against the table to create a smooth, round surface.
Step 3: Create the Peach Shape and Color
- Form the Peach: Hold the sealed bun in your hand. Use your fingers to gently shape one side into a slight point or peak—this will be the top of the peach.
- Make the Crease: Use the dull side of a butter knife, a chopstick, or a bench scraper to press a deep indentation or crease along the side of the bun, running from the top peak almost to the base. This gives the bun the classic peach shape.
- Add the Leaves: Roll the green dough thinly and cut out small leaf shapes. Lightly moisten the base of the peach where the stem would be and attach two leaves.
- Apply Pink Color: Dilute a drop of red or pink gel food coloring with a few drops of water in a small dish. Using a fine brush or a cotton swab, lightly brush the tip (the peak) of the peach bun to create a soft pink blush, mimicking a ripe peach.
Step 4: Final Proof and Steaming
- Second Proof: Place the shaped peach buns on individual squares of parchment paper. Arrange them in your steamer basket, leaving space between them. Cover the steamer and let the buns rest for a final proof of 20 to 30 minutes. (They should puff up slightly, but not double.)
- Steam: Bring water to a rolling boil in your steamer pot. Place the steamer basket containing the buns over the boiling water. Steam the buns over medium to high heat for about 10 to 12 minutes.
- Cool Down: Once done, turn off the heat but do not lift the lid immediately. Leave the lid slightly ajar for 5 minutes. This prevents the buns from deflating or wrinkling due to a sudden temperature change.
- Serve: Remove the buns and serve warm.
Conclusion: A Treasured Tradition
The Longevity Cake is more than just a dessert; it is a heartfelt blessing, a custom that brings families together to honor those who have lived a long and fruitful life. While the process of shaping the peaches takes patience and a little artistry, the final result—a soft, fluffy steamed bun with a sweet filling and beautiful, symbolic design—is an immensely rewarding centerpiece for any celebration.
By mastering this traditional recipe, you’re not just baking a treat; you’re preserving a wonderful tradition and sharing the sweet wishes of health, happiness, and, of course, a long life.
Enjoy the smiles these little peaches bring to your table!
FAQ
Q1: What is the main difference between a Western birthday cake and a Longevity Cake?
The biggest difference lies in the symbolism and form. A Western birthday cake is typically a baked, multi-layered sponge cake covered in frosting. The traditional Chinese Longevity Cake (Shòu Táo Bāo) is a steamed bun made from yeast dough, shaped like a peach, and usually filled with lotus or red bean paste.
Its primary purpose is to symbolize long life and immortality, rather than just being a dessert.
Q2: Can I use a different filling besides red bean paste?
Absolutely. While red bean paste (Anko) and lotus seed paste are the most traditional fillings, you can certainly substitute them with other sweet pastes. Popular choices include:
- Sweetened Mung Bean Paste
- Custard Paste (for a modern twist)
- Sweet Taro Paste
Make sure your filling is firm enough to roll into a ball before stuffing the dough.
Q3: Why did my buns turn out wrinkled after steaming?
This is a very common issue! Wrinkled buns are usually caused by a sudden, drastic drop in temperature when the steamer lid is removed.
To prevent wrinkling:
- Make sure you turn off the heat first.
- Crucially, leave the lid slightly ajar or completely closed for 5 minutes after turning off the heat before fully opening the steamer. This allows the temperature to stabilize gradually.
Q4: My dough didn’t rise. What went wrong?
The most likely culprit is the yeast.
- Water Temperature: The water or milk you used might have been too hot (which kills the yeast) or too cold (which fails to activate it). It should be between 105∘F and 115∘F (40∘C and 46∘C).
- Expired Yeast: Always check the expiration date on your yeast.
- Proofing Environment: The dough needs a warm, draft-free place to rise. If your kitchen is cold, try placing the covered bowl in a slightly warm (but turned off) oven or microwave.
Q5: Can I prepare the Longevity Cake in advance?
Yes, you can.
- Buns: Once steamed and cooled completely, the buns can be stored in an airtight container at room temperature for up to 2 days, or frozen for up to 2 months. To reheat: steam them again for about 5-8 minutes until hot and fluffy.
- Dough: You can prepare the dough and refrigerate it after the first proof. Punch it down, wrap it tightly, and keep it in the fridge for up to 24 hours. Let it come back to room temperature for 30 minutes before shaping.
Q6: I don’t have a steamer. Can I bake these?
The traditional longevity cake is a steamed bun; baking it will result in bread, not the soft, chewy texture of a bao (bun). If you don’t have a traditional bamboo steamer, you can create a makeshift steamer by:
- Using a large pot with a tight-fitting lid.
- Placing a wire cooling rack or trivet inside the pot (make sure it’s above the water line).
- Covering the lid with a towel to prevent condensation from dripping onto the buns.