The 12-to-18-month stage is a crucial time for developing palates and motor skills. Your little one is likely transitioning away from purees and getting serious about finger foods! Chicken is a fantastic protein source, essential for growth and iron intake, but it needs to be prepared in a way that’s soft, easy to chew, and not a choking hazard.
If you’re looking for ways to serve chicken that go beyond basic shreds, we’ve got you covered. Here are 5 Chicken recipes for toddlers 12-18 month that are big on flavor and perfect for tiny hands.
The 5 Go-To Chicken Recipes
General Prep Notes:
For these recipes, the key is tenderness. Use ground chicken, finely diced chicken breast (cut into pieces smaller than a dime), or shred the chicken thoroughly. Always ensure chicken is cooked to an internal temperature of 165∘F.
1. The Recipe: Mini Chicken & Veggie Meatballs
As your little one transitions into the 12-to-18-month stage, finger foods become their main squeeze. It can be challenging to ensure they get enough protein and essential nutrients while they’re mastering the art of self-feeding. That’s where the mighty meatball comes in!
Mini Chicken & Veggie Meatballs are the perfect solution: they are soft, easy for little hands to manage, and an excellent way to sneak in some extra vegetables. This simple recipe yields a freezer-friendly batch that will make your meal prep a breeze.
This recipe is designed to be low in sodium and high in flavor, perfect for toddlers.
Ingredients
- 1 pound of ground chicken (breast or a mix of breast/thigh)
- 1/2 cup finely grated, raw zucchini (ensure you squeeze out excess moisture)
- 1/4 cup finely grated carrot
- 1/4 cup plain breadcrumbs (or rolled oats, for a gluten-free option)
- 1 large egg, lightly beaten
- 1 clove garlic, minced (optional, for flavor)
- 1 teaspoon dried oregano or parsley
- 1 tablespoon olive oil
Step-by-Step Instructions
- Prep the Veggies: Finely grate the zucchini and carrot. Using a clean paper towel or cheesecloth, gently squeeze the excess water out of the grated zucchini. This step is crucial for ensuring your meatballs hold their shape!
- Combine Ingredients: In a large mixing bowl, gently combine the ground chicken, grated zucchini, grated carrot, breadcrumbs (or oats), beaten egg, minced garlic (if using), and dried herbs.
- Mix Gently: Use your hands to mix the ingredients thoroughly but gently. Avoid overmixing, as this can result in tough meatballs. The mixture should be moist and easy to roll.
- Shape the Meatballs: Roll the mixture into tiny balls—no bigger than 1-inch in diameter (about the size of a dime or slightly larger). This small size is ideal for safe toddler chewing and self-feeding.
- Cook the Meatballs (Oven Method): Preheat your oven to 375∘F (190∘C). Lightly grease a baking sheet. Place the meatballs on the sheet and bake for 15-20 minutes, or until they are firm to the touch and cooked through with an internal temperature of 165∘F.
- Quick Stovetop Option: Alternatively, lightly sauté the meatballs in the tablespoon of olive oil over medium heat for 10-12 minutes, rotating them frequently until fully browned and cooked through.
- Cool and Serve: Allow the meatballs to cool completely before serving.
Conclusion: Mealtime Win
These Mini Chicken & Veggie Meatballs are not only delicious but also incredibly versatile. You can serve them plain as a finger food, chop them up and mix them into soft pasta, or serve them with a little tomato sauce.
If you made a big batch, lay the cooled meatballs on a baking sheet and freeze them solid before transferring them to a zip-top freezer bag. They will keep well for up to 3 months, making healthy toddler meals incredibly fast. Enjoy watching your little gourmet discover this new favorite!
2.The Recipe: “Hidden Veggie” Chicken Fritters
Getting your toddler to eat a balanced meal can sometimes feel like a high-stakes negotiation. If you’re struggling to get protein and vegetables past a picky palate, the secret is presentation!
“Hidden Veggie” Chicken Fritters are an absolute mealtime winner. They’re soft, easy for little hands to grip, and the fluffy texture disguises the healthy veggies inside. This recipe is simple, uses ingredients you likely already have, and creates a freezer-friendly snack or meal component.
This recipe uses cooked chicken, making it a great way to use up leftovers!
Ingredients
- 1 cup finely shredded, cooked chicken (rotisserie or boiled chicken works great)
- 1/2 cup grated and lightly packed zucchini (squeeze out excess water!)
- 1/4 cup finely chopped or pureed spinach
- 1/4 cup grated cheddar cheese (optional, but adds great flavor)
- 1 large egg, lightly beaten
- 1/4 cup all-purpose flour or breadcrumbs (use chickpea flour for extra protein)
- 1 teaspoon dried parsley or dill
- Olive oil or coconut oil, for pan-frying
Step-by-Step Instructions
- Prep the Chicken and Veggies: Shred your cooked chicken finely. Grate the zucchini and press it between paper towels to remove as much moisture as possible—wet zucchini will make your fritters soggy! Chop the spinach very finely or give it a quick pulse in a blender.
- Combine the Wet Ingredients: In a medium bowl, whisk the beaten egg and a teaspoon of olive oil together.
- Mix the Filling: Add the shredded chicken, squeezed zucchini, spinach, grated cheese (if using), and dried herbs to the bowl. Stir everything until well combined.
- Add the Binder: Sprinkle the flour or breadcrumbs over the mixture. Mix just enough to incorporate the dry ingredients. The mixture should be sticky and able to hold its shape, but not overly wet. If it seems too loose, add another tablespoon of flour.
- Form the Fritters: Scoop the mixture using a tablespoon and gently form flat, small patties (about 1/2-inch thick and 2-inches wide). Small, flat shapes cook evenly and are safer for toddlers.
- Cook on the Stovetop: Heat a thin layer of olive oil or coconut oil in a large non-stick skillet over medium heat.
- Fry until Golden: Carefully place the fritters in the hot oil. Cook for 3-4 minutes per side, pressing them down lightly with a spatula, until they are golden brown and heated all the way through.
- Cool and Serve: Transfer the cooked fritters to a plate lined with a paper towel to drain excess oil. Let them cool down completely before serving them to your toddler. Cut them into safe, bite-sized strips or squares if needed.
Conclusion: Finger Food Favorite
These “Hidden Veggie” Chicken Fritters are a wonderful way to offer balanced nutrition in a form that toddlers love. They are incredibly versatile: serve them with a little plain yogurt or applesauce for dipping, pack them cold in a lunchbox, or serve them alongside some soft fruit.
Make a double batch and freeze the extras! Simply place the cooled fritters in a single layer on a baking sheet to freeze, then transfer them to a freezer bag. A quick reheat in the oven or air fryer, and you’ll have a healthy meal ready in minutes!
3.The Recipe: Creamy Chicken Noodle Mash
When your toddler is starting to handle slightly more textured foods but isn’t quite ready for a full-fledged adult meal, finding the right in-between dish can be tough. You want something comforting, easy to eat, and packed with nutrition.
Enter Creamy Chicken Noodle Mash—a simple, delicious, and highly customizable dish that is perfect for toddlers 12 months and up. It provides soft carbohydrates, tender protein, and the creamy texture little ones love, making it a guaranteed mealtime success.
This recipe focuses on soft textures and mild flavors, making it gentle on developing digestive systems.
Ingredients
- 1/2 cup small, soft pasta (Orzo, Ditalini, or small star pasta work best)
- 1/2 cup finely diced or thoroughly shredded, cooked chicken
- 1/2 cup milk (whole milk is recommended for toddlers)
- 2 tablespoons full-fat cream cheese or ricotta cheese
- 2 tablespoons of finely mashed or pureed vegetables (e.g., peas, carrots, or butternut squash)
- 1/2 teaspoon unsalted butter (optional, for richness)
- A pinch of dried herbs (like parsley or dill, optional)
Step-by-Step Instructions
- Cook the Pasta: Bring a small pot of water to a boil. Add the small pasta and cook according to package directions, plus an extra minute or two, ensuring the pasta is very soft—this is crucial for easy mashing and chewing. Drain the pasta and set aside.
- Prepare the Chicken: Ensure your cooked chicken is cut into very small pieces (no larger than the size of a pea). If you are using pre-shredded chicken, chop it up even finer.
- Create the Cream Base: In the same empty pot (or a small saucepan), melt the unsalted butter over low heat (if using). Pour in the milk and add the cream cheese or ricotta. Stir continuously until the cheese is fully melted and the sauce is smooth and warm. Do not let the milk boil.
- Add the Filling: Stir the finely diced chicken and the mashed or pureed vegetables into the creamy sauce. Add the pinch of dried herbs, if desired, and stir to combine.
- Combine and Mash: Pour the cooked, drained pasta into the creamy chicken mixture. Stir everything well.
- Achieve the ‘Mash’: For a smoother, easier-to-eat texture, use a fork or potato masher to lightly mash the mixture right in the pot. You want to break up some of the pasta and chicken pieces so the dish has a soft, cohesive consistency, but still retains some texture.
- Serve Warm: Transfer the Creamy Chicken Noodle Mash to a bowl and let it cool until it is comfortably warm for your toddler.
Conclusion: A Step Toward Family Meals
The beauty of Creamy Chicken Noodle Mash is that it feels like a comforting, substantial meal while still being extremely easy for your toddler to manage. It’s an excellent way to transition them from purees to chunky textures and helps them practice using a spoon.
If the mash is too thick, simply add a little more milk or low-sodium chicken broth. If you want to make a big batch, let it cool completely before storing it in the refrigerator in airtight containers for up to 3 days. This simple recipe is a fantastic tool for busy parents!
4.The Recipe: Avocado Chicken Salad (No Mayo)
Introducing new proteins and textures to your toddler can be challenging, especially when you want to avoid unnecessary ingredients like high-sodium dressings. Thankfully, nature has provided the perfect creamy binder: the humble avocado!
Avocado Chicken Salad (No Mayo) is a fantastic, nutrient-dense recipe for toddlers 12 months and up. It replaces traditional mayonnaise with heart-healthy fats from avocado, creating a soft, smooth texture that is easy to spread and chew. This recipe is simple to whip up and perfect for healthy toddler finger foods.
This recipe is designed to be low-sodium, high in healthy fats, and super soft for little mouths.
Ingredients
- 1 cup finely shredded, cooked chicken (leftover rotisserie chicken works perfectly)
- 1 ripe avocado
- 1 tablespoon plain full-fat Greek yogurt (optional, for extra creaminess and probiotics)
- 1/2 teaspoon fresh lemon or lime juice (essential for preventing browning)
- 1 tablespoon finely chopped fresh cilantro or parsley (optional, for color and mild flavor)
- A small pinch of garlic powder (optional, for flavor)
Step-by-Step Instructions
- Prepare the Chicken: Ensure your cooked chicken is shredded very finely or chopped into pieces no larger than a grain of rice. Since this is for toddlers, the smaller the piece, the safer it is.
- Mash the Avocado: Cut the ripe avocado in half, remove the pit, and scoop the flesh into a medium bowl. Add the lemon or lime juice immediately. Use a fork to thoroughly mash the avocado until it is completely smooth and creamy, with no large lumps.
- Create the Base: Stir the optional Greek yogurt and the pinch of garlic powder into the mashed avocado. The yogurt enhances the creamy texture and boosts the healthy fat content.
- Combine the Salad: Add the finely shredded chicken and the chopped herbs (cilantro or parsley) to the avocado mixture.
- Mix Gently: Use a spoon to gently fold the chicken into the avocado mixture until the chicken is completely coated. Taste a tiny bit yourself—if it seems too thick, add a drop or two of water or breast milk/formula to loosen it up. Do not add salt.
- Chill and Serve: Cover the bowl and refrigerate the Avocado Chicken Salad for about 15 minutes. This allows the flavors to meld and the mixture to firm up slightly.
- Safe Serving: Serve thinly spread on soft, crustless whole-wheat bread, or simply offer it as a scoop alongside soft-cooked sweet potato chunks or a piece of mango for an easy finger-food meal.
Conclusion: A Quick, Healthy Toddler Lunch
The beauty of Avocado Chicken Salad (No Mayo) is its versatility and nutritional value. It delivers essential protein from the chicken and healthy monounsaturated fats from the avocado, both crucial for a growing toddler’s brain development.
Since avocado can brown quickly, this dish is best consumed within 1−2 days. Storing it in an airtight container with a piece of the avocado pit can sometimes help slow the browning process. Enjoy this quick and healthy alternative to traditional chicken salad!
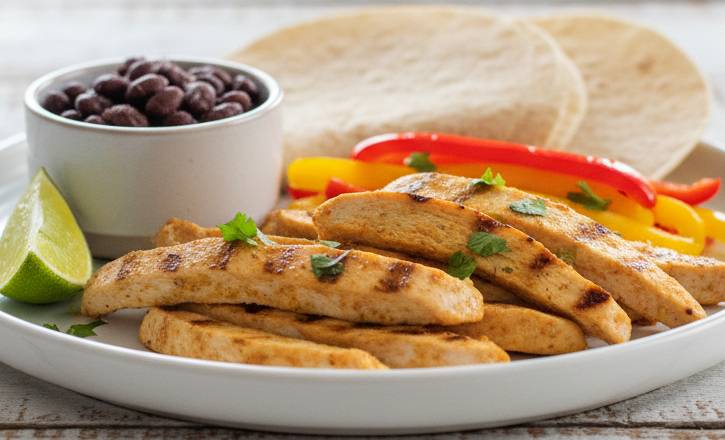
5.The Recipe: Mild “Fajita” Chicken Strips
As your toddler approaches 18 months and beyond, you start looking for ways to introduce the family to more complex and interesting flavors—without the heat. Chicken is still a protein powerhouse, but serving it plain can get boring!
Our recipe for Mild “Fajita” Chicken Strips is the perfect solution. It uses a simple yogurt marinade to tenderize the chicken and adds just a hint of aromatic spices (like cumin and paprika) to awaken your toddler’s palate. The result is soft, flavorful strips that are ideal for chewing practice and dipping.
This recipe uses a quick yogurt marinade to ensure the chicken stays incredibly tender and moist.
Ingredients
- 1 boneless, skinless chicken breast (about 6-8 ounces)
- 1/4 cup plain, full-fat Greek yogurt (or plain kefir)
- 1/2 teaspoon ground cumin
- 1/4 teaspoon sweet paprika (ensure it is not hot/smoked paprika)
- 1 teaspoon lime juice (freshly squeezed is best)
- 1 small clove of garlic, minced (optional)
- 1 tablespoon olive oil, for cooking
Step-by-Step Instructions
- Prep the Chicken: Trim any fat from the chicken breast. Slice the chicken breast into long, thin strips, about 1/4-inch thick and 2-inches long. Thin strips cook quickly and are much safer for toddlers to chew than cubes.
- Make the Marinade: In a medium bowl, whisk together the Greek yogurt, cumin, sweet paprika, lime juice, and minced garlic (if using).
- Marinate for Tenderness: Add the chicken strips to the yogurt mixture. Stir until every piece of chicken is thoroughly coated. Cover the bowl and let it marinate in the refrigerator for at least 30 minutes, or up to 2 hours. The acid in the yogurt helps tenderize the meat, making it super soft.
- Cook the Strips: Heat the olive oil in a non-stick skillet over medium-high heat.
- Sear to Cook: Carefully place the marinated chicken strips in the hot skillet, making sure not to overcrowd the pan (cook in batches if necessary). Cook for about 3-4 minutes per side, until the chicken is golden brown, firm, and cooked completely through (internal temperature of 165∘F). The yogurt coating will create a nice crust.
- Cool and Serve: Remove the chicken strips from the pan and let them cool on a cutting board. Once cool, you can either serve the strips as is for a great finger food, or cut them into smaller, bite-sized pieces for your toddler.
Conclusion: Introducing Global Flavors Safely
These Mild “Fajita” Chicken Strips are a fantastic way to introduce your toddler to the delicious flavors of global cuisine. The yogurt ensures the texture is soft, and the mild spices encourage adventurous eating habits early on.
Serve these strips alongside soft-cooked bell peppers, a spoonful of mashed black beans, or inside a small, warmed piece of soft tortilla for an authentic (and healthy!) toddler fajita experience. This recipe proves that healthy food for little ones doesn’t have to be bland!
FAQ
Q1: Is it safe to give my 12-month-old chicken that is not pureed?
A: Yes, absolutely. By 12 months, most toddlers are ready for soft, finely chopped, or shredded solid foods. Transitioning to textures like the Mini Chicken Meatballs or soft Chicken Fritters is crucial for developing chewing skills and jaw muscles. Just ensure the chicken is very tender and cut into small, manageable pieces (no bigger than a pinky fingernail) to prevent choking.
Q2: What is the best way to cook chicken to make it soft for a toddler?
A: The goal is maximum tenderness. Steaming, boiling, or slow-cooking chicken breast are excellent methods. For recipes like the Mild “Fajita” Chicken Strips, using a yogurt or buttermilk marinade is key, as the acid in the yogurt helps break down the meat fibers, resulting in a significantly softer, more tender texture.
Q3: How should I store and reheat these chicken recipes?
A:
- Storage: Most cooked chicken recipes (meatballs, fritters, noodle mash) can be stored in an airtight container in the refrigerator for up to 3 days.
- Reheating: Reheat thoroughly until steaming hot, then allow the food to cool to a safe eating temperature before serving. For meatballs and fritters, a quick reheat in a toaster oven or air fryer helps retain a better texture than a microwave.
Q4: My toddler is a picky eater. How can I get them to try the “Hidden Veggie” Fritters?
A: Toddlers often respond better to familiarity and fun.
- Presentation: Cut the Fritters into fun shapes (squares or triangles) and serve them with a familiar, favorite dip like plain yogurt, applesauce, or a tiny bit of hummus.
- Persistence: It can take up to 10-15 exposures before a toddler accepts a new food. Offer the fritters regularly alongside foods you know they will eat, but don’t pressure them.
Q5: Can I freeze these recipes for future meals?
A: Yes! The Mini Chicken Meatballs and “Hidden Veggie” Chicken Fritters are ideal for freezing.
- Bake or fry them completely.
- Let them cool fully.
- Place them on a baking sheet in a single layer to flash freeze for about an hour.
- Transfer the frozen items to a zip-top freezer bag or container.
They will last well for up to 3 months. Reheat them straight from the freezer in the oven or air fryer.